Fitting a VDO clock
Ever since I first got her, Vera has had an ugly-looking half-size VDO clock in her instrument cluster. I could never set time on it, due to the adjuster knob having fallen off before I got her.
The first task is to disconnect the negative terminal from the battery.
Then reach up underneath the dashboard and unscrew the speedo cable from the instrument ckuster.
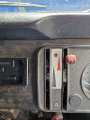 |
Wiggle and pull out the 3 heater control knobs. Remove the 4 screws; the metal clips that hold the instrument cluster in place will likely fall down behind the dashboard ... possibly onto exposed terminals on a relay behind the dashboard causing a nasty short...but this won't happen because you disconnected the battery right? |
 |
You should now find that you can lift the instrument cluster free ... rest it face down on the steering column allowing you access to the back of it. |
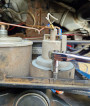 |
This is the rear of the old clock, it has been fitted in a hole made though the factory blanking plate. It is held in place by 2 hex-head screws.
The old light has 3 connections; GND, +12v and a +12v Bulb line. Disconnect them before unscrewing the 2 bolts and removing the light. |
 |
The grubby old clock can be lifted out. |
 |
Shiny replacement bought off of Ebay for £106, which was a decent price considering that the condition of the unit is A1 and other sellers were looking for £130-£140 ... crazy money for a van clock! |
 |
Time to refit the instrument cluster, suprisingly, this was the trickiest bit. This is one of the 4 clips which holds the cluster in place via the four screws aleady removed.
On a RHD bus it's impossible to get the two screws and clips on the lefthand-side into place. If you reach up under the dashboard to try and hold the clips, you'll find the way blocked by the relay and heater controls. After much cursing and f***ing around, I found the best way to do it was the remove the radio and radio cage, then it was relatively straightforward to put your hand through the hole and hold the lefthand-sided clips whilst pushing in and tightening the screws. You can easily reach up behind the dashboard to fit the two righthand-side clips with relative ease. |
 |
I reconnected the battery terminal and watched as the second-hand swept around the dial with a barely audible ticking sound. |